1This chapter begins the empirical part of the tutorial. It will lead us from setting up the software, importing and checking the data, to preparing and preprocessing the sample for analysis.
2For the tasks below, you will need about 1 GB of disk space to download and install Orange with Miniconda, 2.3 GB of space for the original ParlaMint files (if you wish to work with the original data), and 1.9 GB for all three versions of pre-formatted pickle files (if you wish to speed up the analysis). Keep in mind that topic modelling is resource-intensive and might get slow on computers with insufficient RAM.
5.1. Orange: setup and use
1The analysis will be performed in Orange v3.32.0, a Python-based open-source software for data analysis (Demšar et al., 2013). In Orange, the Text add-on offers a special tool kit for text mining. Orange is based on visual programming. The analysis is performed through a data analysis workflow, i.e., a series of steps or widgets that the user selects, thereby not requiring any coding knowledge.
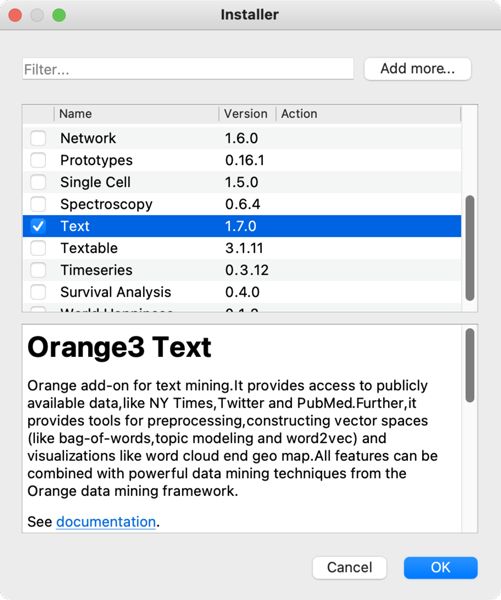
2First, we download the software from orangedatamining.com onto the computer. We open the downloaded file and follow installer instructions. Once we open the program, we install the Text add-on (v1.10.0) by clicking the Options tab and selecting Add-ons in the drop-down menu. In the window that opens, we tick the Text field, and confirm the add-on installation by clicking the OK button (Figure 1).
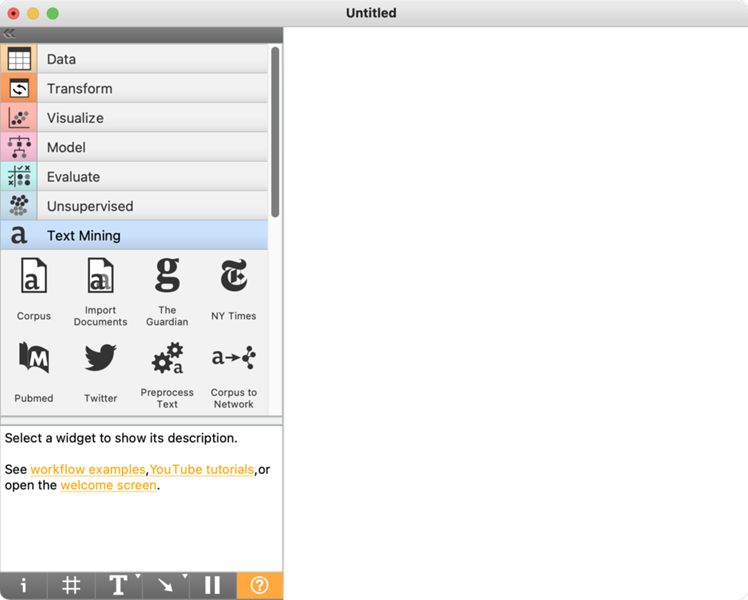
3To complete the installation, we must restart Orange.4 When we do so, the left-hand menu will contain the Text Mining tab with various widgets (e.g., Corpus, Bag of Words) intended for text analysis (Figure 2). On the right-hand side, there is a white field called canvas. We will place the widgets on the canvas and connect them in an analytical workflow.
4The widgets can be added on the canvas by dragging them from the menu on the left and dropping them onto the canvas or by right-clicking on the canvas to open a drop-down menu, typing the widget's name, e.g., Corpus, and pressing Enter. A double click on the widget will open a settings window. Every widget has an input on the left, an output on the right, or both. They are marked with a dashed line at the side of the widget. In Orange, analysis always runs from left to right, never in the opposite direction.
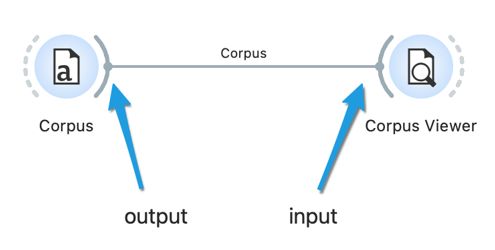
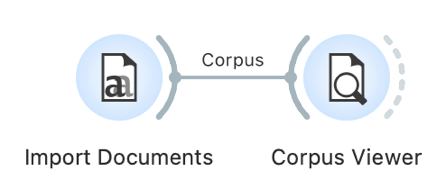
5Using the same steps as when adding the Corpus widget, we add the Corpus Viewer widget. By double-clicking it, an empty window opens: the widget has not yet received any data to analyse. We can send the data to the widget by connecting the two widgets, specifically by using the mouse to connect the right-hand dashed line of the Corpus widget with the left-hand dashed line of the Corpus Viewer widget (Figure 3). Then, we double-click Corpus Viewer again, and this time, the window will display data.5
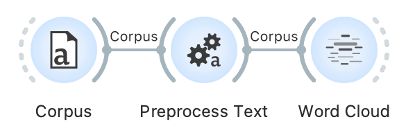
6The tutorial will describe how to build a workflow to perform topic modelling of parliamentary debates and explore the topics with additional visualisations. Although you can download the entire workflow, we recommend you follow the individual tutorial steps and create the sequence of widgets by yourselves; this is how you will best understand the separate analysis phases.
5.2. Loading data into Orange
1The ParlaMint-GB corpus holds parliamentary speeches from the 2015 to 2021 period. Since the empirical part of the tutorial will compare the speeches made before and during the COVID-19 pandemic, the data must first be limited to two comparably long periods before and during the pandemic. The pandemic period included in the ParlaMint-GB corpus lasts from November 2019 onwards (see Erjavec et al., 2022). We wish to choose similarly long periods; hence we will select 2019 for the pre-pandemic and 2020 for the pandemic period.6
2The analysis will use the British part of the linguistically annotated corpus of parliamentary data ParlaMint 2.1 (see Chapter 3.3) which is available in the CoNLL-U format. To load the data, follow Option 1 below. If you are experiencing problems, try Option 2 instead.
| Option 1: follow the tutorial | Option 2: speed up the analysis |
 |  |
| You will get the most comprehensive understanding of the entire process (from the preparation of data to the final results) if you follow along the tutorial. Certain steps might take your computer some time to process, so please be patient. If you decide for this option, download the CoNLL-U files 7 and continue below.8 | If you are unable to load the CoNLL-U files, download the .pkl data, load the data to Orange with the Corpus widget and continue with chapter 5.3. |
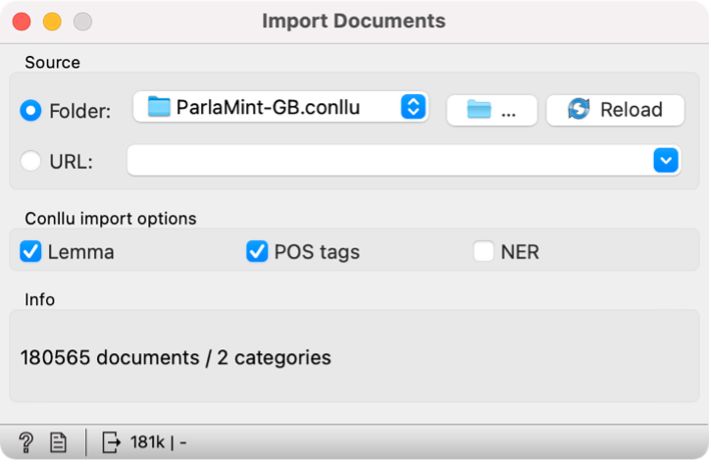
3If you are using the CoNLL-U files, add the Import Documents widget to the canvas to import data into Orange. First, we open the widget with a double click, and in the first line, select the folder in which we have stored the data (Figure 4). It is not necessary to confirm the import; it happens automatically when we select a folder. Below, we tick the Lemma and POS tags options, which will import the lemmas and the parts of speech with the speeches. A speech by an individual MP at a specific session will be presented as an individual document. At the bottom of the window, the software will inform us that we have imported 180,565 documents or files.

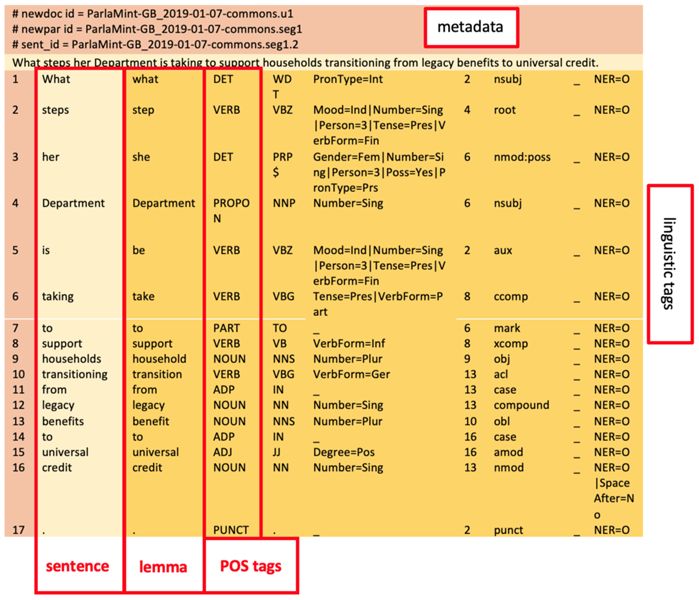
4For a better understanding of the data structure, here are a few characteristics of the CoNLL-U format. CoNLL-U is a type of TSV format in which tab characters separate the values. In natural language processing, it is used to represent linguistically annotated texts as its distribution of texts and annotations in columns allows for a straight-forward computer processing. Each sentence is considered one segment in this format. The text is in a vertical or long format, i.e., one word per line, which enables a clear overview of added linguistic annotations. There are metadata at the beginning of every sentence (e.g., speech ID, sentence ID, and text) (Figure 5).
5.3. Data overview
1Before we begin the analysis, let us make sure that the data we have uploaded is correct. We can do this in the Corpus Viewer widget. First, we add it to the canvas and connect it from left to right with the previous widget. Then, we double click Corpus Viewer to open it and display a list of documents. In our case, these are the individual speeches (Figure 6). By clicking on the list, we can see different speeches. Holding the Shift key while clicking will display several speeches simultaneously.
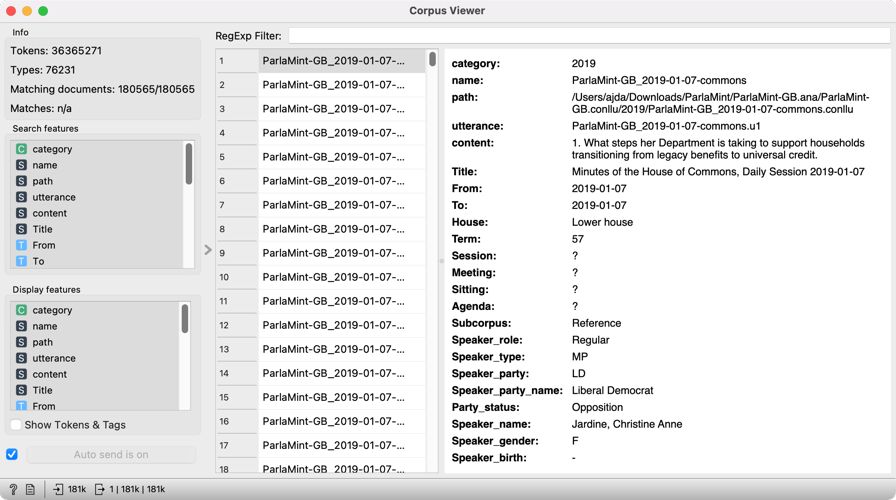
2In the top left-hand corner, we can see the basic information on the corpus: the number of tokens, types 9 and the number of documents that match the regexp filter if we use one (matching documents). As the filter is now empty, all the documents are displayed (180565/180565). The last information, matches, is the number of documents matching the search query that we can enter in the RegExp Filter.10
3The viewer on the right displays numerous metadata11 on the speeches and the speakers.12 Every speech has data on the name of the session it belongs to and a unique utterance designation, the last number of which marks the consecutive number of the speech in the given session. We can read the entire speech under the content variable. Another important piece of data is the subcorpus variable; it marks the time the speech was given (reference stands for the speeches delivered before November 2019, while COVID stands for those given since).
4Next is the data on the speaker: their role (chairperson or regular speaker), their type (MP or guest), their affiliation (Speaker party), their party status (opposition or coalition), their name, gender, and year of birth.
5.4. Preparing and preprocessing the subcorpus
1As shown in Chapter 3, parliamentary discourse is marked by a clear structure with numerous typical phrases such as “Ms/Mr … has the floor”, “Thank you for the floor, honourable member”, or “The agenda is approved”. Certain expressions that guide the discussion are especially typical of the chairpersons; others are merely parts of polite communication. Due to their nature, such phrases are very common in parliamentary corpora but not of interest for topic analysis. As they would only represent noise in the results, they should be removed from the corpus. Although it is impossible to remove them automatically in their entirety, their number can still be significantly reduced. We can do this by preparing a subcorpus and removing every chairperson’s speech and speeches shorter than 50 words (Figure 8).
“It is very good to welcome the hon. Member for North West Durham (Laura Pidcock) back to the House.”(John Simon Bercow, House of Commons, 7 January 2019)
2The decision is based on a manual overview of the corpus, proving that such speeches mainly interject or express thanks. Other related research (Curran et al., 2018) has done similar filtering. Although these speeches are not necessarily of a purely procedural nature, their brevity still makes them less appropriate for topic modelling following the LDA method, which requires longer texts to achieve good results (see Chapter 4). Along with the too-short speeches, the sample will also exclude speeches from guests of the parliament.
5.4.1. Removing unwanted speeches
| Option 1: follow the tutorial | Option 2: speed up the analysis |
 |  |
| Continue with the steps below. | If the sampling process is slow, first open a new session in Orange. Then download ParlaMint-GB-sample.pkl file and load it with the Corpus widget. The file contains the sample we will create in the next step. Continue with Chapter 5.4.2. |
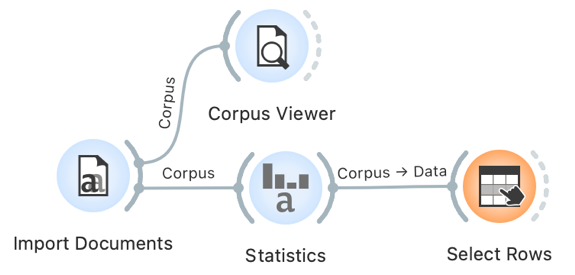
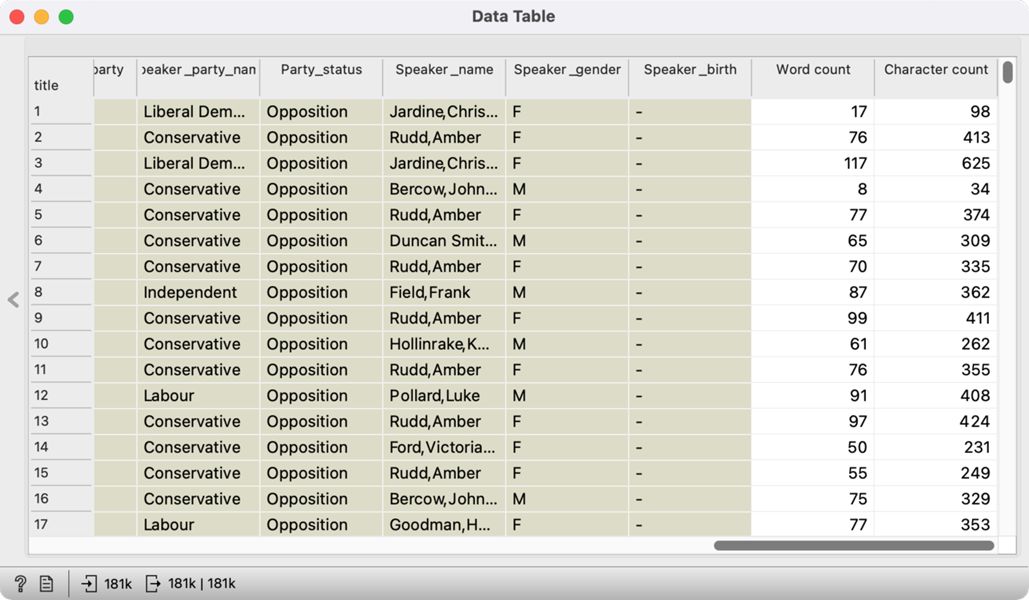
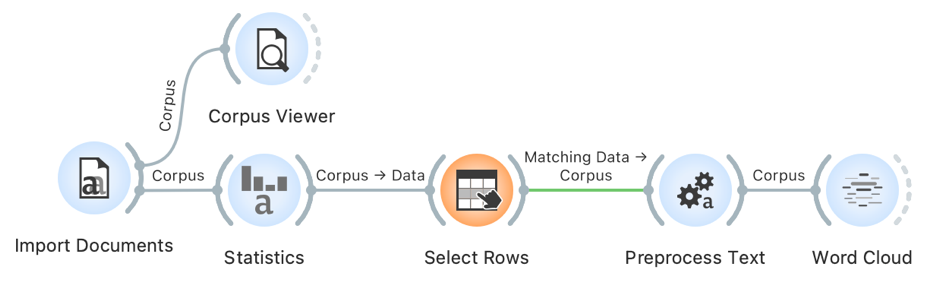
1We will need the Statistics and Select Rows widgets to create the sample. We place the Statistics widget on the canvas and connect it with the Import Documents widget – we do not change the settings; they will instruct the Statistics widget to perform a word and character count in the documents. The Data Table widget, which we connect to the Statistics widget, allows us to see the two columns at the far right of the window with the number of words and characters in each speech (Figure 7). Now that the data on the speech length is known, we can use the Select Rows widget to select only the speeches that match the desired length.
2First, we add the Select Rows widget (Figure 8), connect it to the Statistics widget, open it, and set three conditions (by clicking the Add condition button):
- The first criterion will set the speech length threshold – we limit the Word count variable with the is greater than option and enter the desired minimal length, in our case 50, which will limit the sample to speeches with 51 words or more;
- The second criterion will exclude the session chairpersons – we set the Speaker role variable by selecting the is and the Regular parameter;
- The third criterion will only keep MP speeches in the sample – we set the Speaker type variable by selecting the is and the MP variable, which will exclude the speeches given by the guests.

3The data at the bottom of the Select Rows widget tells us that the number of speeches has dropped to 130,453 (from the previous 180,565; the complete information on the output can be accessed by clicking the numbers at the bottom).
5.4.2. Removing unwanted words
1To achieve good topic modelling results, we must also preprocess the data (see Chapter 4.3). We can do this by filtering in the Preprocess Text widget, which we insert immediately after the Select Rows widget. Before connecting the two widgets, we will first set the parameters to ensure smoother operation. Nonetheless, please note that the preprocessing step may take quite some time to complete. To set the parameters, we first open the Preprocess Text widget. In it, we will see the default steps for text preprocessing (their order and settings can be modified). As the data has already been tokenized and the words transformed so that they all begin with a lowercase letter (Chapter 5.3), we can remove the Transformation and Tokenization steps by clicking on the cross in the upper left-hand (Mac OS) or right-hand corner (Windows).13 We are left with the Filtering step, where a few settings need to be changed (Figure 9):
- Clearing the Stopwords option – as we will only focus on nouns, we will not need this option which excludes function words such as pronouns, conjunctions, and prepositions;
- Selecting the Document frequency option and the Absolute measure, where we set the span from 10 to max14 (total number of speeches) – the analysis will therefore exclude any words that appear in fewer than ten speeches, e.g., exclude the extremely rare words that do not influence the forming of specific topics;
- Selecting the POS tags option because the data contains part-of-speech tagging (see Chapter 3.3). The default setting of this option includes only nouns and verbs in later analyses. However, as nouns proved to be the most useful part of speech in topic modelling (see Martin and Johnson, 2015), we will only keep those and eliminate verbs.

2Once we have set the parameters (as seen in Figure 9), we can connect Preprocess Text with Select Rows.
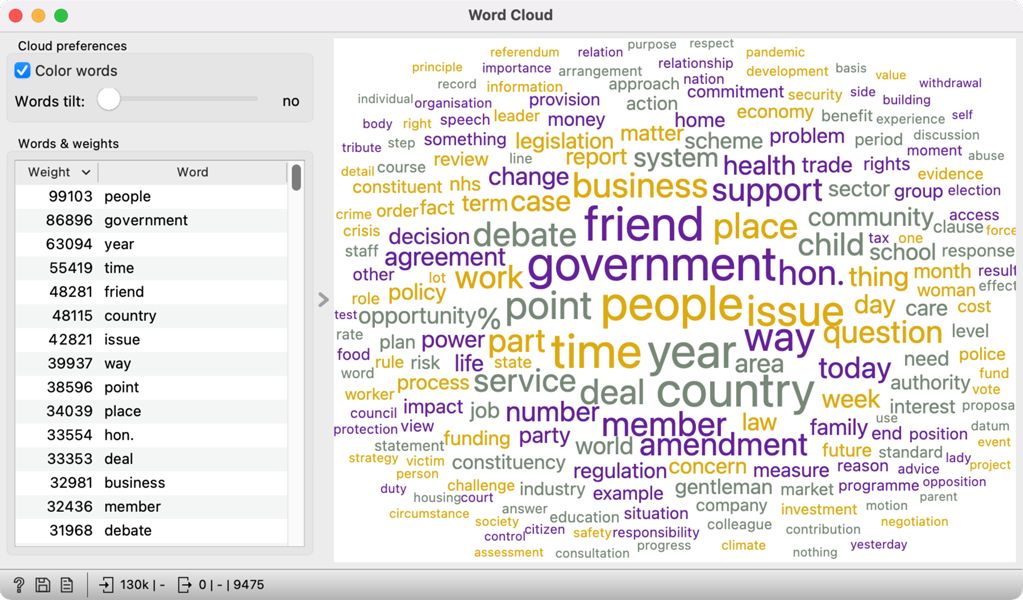
3We can visualise the words that appear most often in the sample with a word cloud. To do so, we connect Word Cloud to Preprocess Text. The word cloud will only feature nouns; the size of the word is proportional to its frequency (Figure 10). The displayed words reflect the parliamentary genre of the data. The list on the left shows that the most frequently used word is people, which appears 99,103 times. The parliament is voted by the people and works for the people, so such a result is not very surprising.
4Preprocessing is an important part of processing text data, but every step must be clearly defined. Every decision influences the results, which must be considered during interpretation. Please note that filtering in Orange does not modify the original data. Therefore, the preprocessing step does not erase the original corpus from the Select Rows widget but only adds information on tokens in the Preprocess Text widget.
4. If you have used Orange before, please clear widget settings under Options Reset widget settings. This will enable you to repeat the analysis as described in the tutorial.
5. The data shown come with the widget.
6. It has been established that the delimited periods are comparable in terms of the quantity of speeches and sessions that they encompass.
7. The folder will contain linguistically annotated parliamentary speeches in the CoNLL-U format and metadata in the TSV format. Keep all the files in the folder for the import.
8. This is the file format you get from the CLARIN.SI repository if you search for the ParlaMint data with added linguistic annotations. The provided link will lead you to a selection of files that are relevant for this tutorial (i.e., only the data from 2019 and 2020). The Parla-Mint-GB corpus, however, includes much more data. If, at a later time, you would like to analyse the entire corpus or a different time period, you can get the entire corpus from the ParlaMint-GB.ana.tgz folder in the CLARIN.SI repository and make a selection of the data according to your needs.
9. The token number is the number of every word, number, and punctuation mark in the corpus, while the type is the number of unique tokens in the corpus.
10. When specifying a query, you can use regular expressions, which enable searching for specific words or word forms. The query epidemic* will, for example, list the word epidemic in all its forms.
11. Certain metadata might be missing if the original parliamentary records are imperfect. Linguistic annotations have been added automatically. This means that you should allow for some annotation errors, even though the tools used are pretty accurate: 98–99% for lemmatisation, 94–97% for morphological tagging and 87–94% for syntactic tagging (Erjavec et al., 2022).
12. While the entire ParlaMint corpus family has the same set of metadata (see Chapter 3.3), not every corpus includes all metadata.
13. If you wish to disable the data updating after every parameter change, uncheck the Apply Automatically option in the bottom left corner – then click Apply once you have done all the changes.
14. Set max by removing/deleting the upper threshold.